While deviations in macrogeometry and microgeometry, which considerably influence the performance and noise emission of the gear, can be more or less marked depending on the demands placed on component quality, the external zone of the machined tooth flank must be devoid of influence on structure. Damage in the tooth flank’s external zone via textural influence causes a reduction in the wear resistance of the teeth. It can even lead to a complete failure of the gears (tooth fracture). An influence on the structure (grinding burn) caused by thermal overload of the tooth flank during the machining process must therefore be avoided. Due to the complex geometry of the tooth space and the resulting large contact surfaces between the grinding wheel and the workpiece, thermal stress during gear grinding is however relatively high, generally limiting the performance of the method. Alteration of the workpiece’s external zone due to textural change is varyingly pronounced depending on the degree of thermal damage. Typical forms of damage are:
• grinding burn,
• cracks,
• a drop in hardness in the external layers of the workpiece and
• re-hardening or increased hardening.
Besides the reduction of the workpiece’s hardness, textural change also leads to a shift from the compressive residual stresses existing in the external zone of the workpiece to tensile residual stresses. This has unfavourable effects on the load capacity and wear behaviour of the tooth flank [Baus94, Bouc94, Klum94, KOEN79, KOEN93, Kosc76, SCHL03].
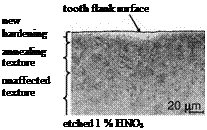
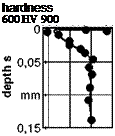
Fig. 6-74 shows a microgram of a cross-section of a tooth after considerable grinding burn. Under the traced boundary to the flank surface there appears a
 |
 |


 |
 |
wide, lens-shaped new or re-hardening zone consisting of non-etched, structureless martensite. Beneath this re-hardening zone lies a zone with an annealing structure. The annealing structure is characterised by an near-sudden decline and then continuous climb in hardness back to the original value (basic hardness). Already a drop in hardness between HV 20 and 40 is an indication of external zone damage of the tooth flank. These deviations can be captured more securely metrologically, yet this necessitates a destructive examination of the workpiece.
Fig. 6-74. Cross-section of a tooth with grinding burn
In industrial praxis, workpieces are tested for possible influence on their structure by means of nital etching tests. In the case of this non-destructive testing method, the surface changes colour in the vicinity of thermally damaged external zones, whereby annealed structures appear black. A further possibility for nondestructive detection of thermal textural damage is micromagnetic testing with the help of Barkhausen noise. The signal reacts both to changes in external zone hardness and to changes in the residual stress condition. Since this is a case of relative measurement, calibration of the measurement with test workpieces of varying degrees of damage is required [DAPP99].
