In any grinding process mechanical, thermal, and even chemical effects are usually superimposed in the zone of contact. Grinding in any variation is generating a significant amount of heat that may cause a deterioration of the dimensional accuracy of the workpiece, an undesirable change of the surface integrity, or lead to increased wear of the wheel. Figure 11.11 shows the most popular temperature measurement devices. The preferred method for temperature measurement in grinding is the use of thermocouples. The second metal in a thermocouple can be the workpiece material itself; this setup is called the single-wire or single-pole method. A further distinction is made according to the type of insulation. A permanent insulation of the thin wire or foil from the workpiece by use of sheet mica is known as open circuit. The insulation is interrupted by the individual abrasive grains; thus, measurements can be repeated or process conditions varied until the wire is worn or damaged. Many authors used this setup. Also the grinding wheel can be equipped with the thin wire or a thermo foil if the insulation properties of abrasive and bond material are sufficient. In the closed circuit type, a permanent contact of the thermal wire and the workpiece by welding or brazing is achieved. The most important advantage of this method is the possibility to measure temperatures in different distances from the zone of contact until the thermocouple is finally exposed
 |
at the surface. For the single-wire method, it is necessary to calibrate the thermocouple for every different workpiece material. This disadvantage is overcome by the use of standardized thermocouples where the two different materials are assembled in a ready-for-use system with sufficient protection. A large variety of sizes and material combinations are available for a wide range of technical purposes.
With this two-wire method it is again possible to measure the temperatures at different distances from the zone of contact. This approach can be regarded as most popular for temperature measurement in grinding. One disadvantage of the double-pole technique is that the depth of the thermocouple junction is much larger than it is for the single-pole technique. This has the effect that the temperature reading is averaged over a greater depth below the surface in a region where there is a steep temperature gradient.
Recent advances in application of thin-film single-pole and double-pole thermocouples offer considerable advantages of accuracy and of giving a direct temperature reading at the contact zone [Marinescu et al. 2004, Batako, Rowe, and Morgan 2005].
Thin film grindable thermocouples are a special case of the single-wire and two-wire methods [Lierse 1998, Batako et al. 2005]. An advantage of the thin-film method is an extremely small contact depth to resolve temperatures in a small area at the contact surface and the possibility to measure a temperature profile for every single test depending on the number of evaporated thermocouples in simultaneous use. Batako et al. found that a thin, but wide, single-pole thermocouple greatly increases the probability of maintaining a continuous temperature signal throughout the passage through the grinding contact zone.
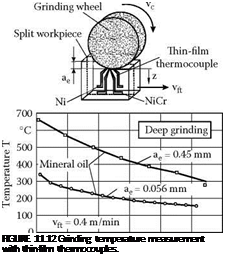
Temperature measurements using thin-film thermocouples are shown in Figure 11.12 in grinding Al2O3 ceramic with a resin-bonded diamond grinding wheel [Lierse 1998]. Obviously, the set grinding conditions have a significant influence on the generation of heat in the zone of contact. The heat penetration time is of major importance. In deep grinding with very small tangential feed speed, high temperatures are registered, whereas higher tangential feed speeds in pendulum grinding lead to a significant temperature reduction. As expected the avoidance of coolant leads to higher temperatures compared to a use of mineral oil. However, in any case, either for single or two-wire methods, the major disadvantage is the high effort to carry out these measurements. Due to the necessity to install the thermocouple as close to the zone of contact as possible, it is always a technique where either grinding wheel or workpiece has to be specially prepared. Thus, all these

methods are only used in fundamental research; an industrial use for monitoring is not possible due to the partial destruction of major components.
Besides these heat conduction-based methods the second group of usable techniques is related to heat radiation. Infrared radiation techniques were used to investigate the temperature of grinding wheel and chips. By the use of a special infrared radiation pyrometer, with the radiation transmitted through optical fiber, it is even possible to measure the temperature of working grains of the grinding wheel just after cutting [Ueda, Hosokawa, and Yamamoto 1985]. Also, the use of coolant was possible and could be evaluated. In any case, these radiation-based systems need a careful calibration, taking into account the properties of the material to be investigated, the optical fiber characteristics, and the sensitivity of the detector cell. However, again for most of the investigations a preparation of the workpiece was necessary as shown in Figure 11.11 (bottom left).
A second heat radiation-based method uses thermography. For this type of measurement, the use of coolants is always a severe problem because the initial radiation generated in the zone of contact is significantly reduced in the mist or direct flow of the coolant until it is detected in the camera. Thus, the major application of this technique was limited to dry machining. Brunner [1998] was able to use a high-speed video thermography system for OD-grinding of steel to investigate the potential of dry or MQL grinding [Karpuschewski 2001].
